It’s been a while and I must admit I have missed this place. I have checked in every once in a while and I know some of you out there have been doing the same and for that I thank you. The time is right for me to get back in the blogging saddle.
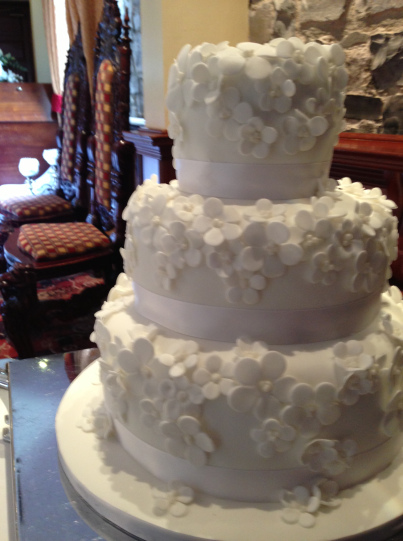
This cake had to be my first post after my absence. Last November my brother and his then partner asked me to make their wedding cake. I was both thrilled and terrified in equal measure and the first words from my mouth were “You do know I’ve never made one before don’t you?!”. Luckily the happy couple were so chilled about their Big Day and their only instruction was “something simple to cut for the photographs” so I pretty much had carte blanche to do what I wanted. Making a homemade wedding cake is quite daunting as it is such an important day for the couple and I definitely lost a few hours sleep close to the day itself but it is without doubt something I am very glad I did – there are lots of things I learned along the way and definitely a few mistakes that I would do differently if I could rewind.
The first port of call was my aunt Marcella, the original Domestic Goddess as far as I’m concerned, who gave me lots of encouragement and recommended a fantastic book – Peggy Porschen’s Favourite Cakes & Cookies – which not only contained lots of fantastic inspiration but also vital instructions from how to make sugar paste flowers to how to assemble the tiers.
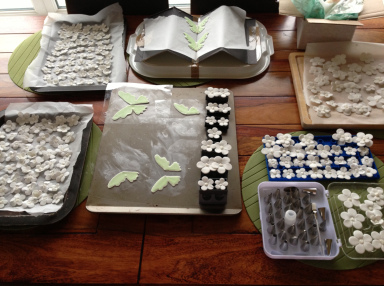
One thing that was really important to me was to include something on the cake that represented our mum, who we sadly lost last September and miss dearly. My mum loved watching the butterflies out in the garden flitting around and they now always remind me of her so I was delighted to find a template and instructions for this gorgeous little butterfly in the book. I think she would have loved that.
As for the cakes themselves I made the bottom tier using the Christmas Cake recipe in Nigella’s Domestic Goddess, the second tier using my interpretation of many carrot cakes, and I will blog this soon, and the top tier was made using three rounds of very fudgy chocolate brownies using a recipe from the River Cottage Family Cookbook (with a mix of milk and 70% chocolate) sandwiched together with chocolate buttercream. I picked carrot cake and brownies as the cakes have to be baked a few days before the event so that both the buttercream and then the icing are allowed to set overnight and I knew that both of these stay moist and tend to improve after a day or two.
So what would I do differently? Well firstly I would have made all of the flowers well in advance as they could have been done weeks ahead and stored in an airtight container instead of late in to the night in a bit of a panic. I didn’t order specialist foam pads for shaping the flowers and I didn’t think about how or where the flowers would hold their shape whilst they dried out until we were up to our eyes in florists sugar paste which has to be used quite quickly before it dries out. In the end after much scratching of heads we settled on using some of my son’s old lego upturned and it worked brilliantly! I also used the inside lid of the icing nozzle tray and a wooden block with holes drilled in it. I had simple five-petal flower cutters in four sizes and after shaping, some curled up and some a bit flatter to give differing shapes, I piped in a little icing to stick three pearl dragees in the centre of each flower, a task carried out brilliantly by my boy. I really liked the higgledy-piggledy shapes and sizes of the flowers on the cake and it reminded me of falling blossoms from the Cherry Blossom trees that lined the street where we grew up in London. The beauty of using so many flowers also meant that any bumps etc in the sugar paste icing were mostly covered so it was great for a first timer like me. I think I would probably have made a white chocolate buttercream for the brownies as it would be less dangerous in terms of leaving smudges when icing.
One big mistake I made was not cutting the domed tops off the fruit and carrot cakes and turning them upside down so that I had a completely flat surface which would not only have been neater for applying the sugar paste icing but also have ensured that the following tiers sat neatly and flatly on the cake underneath. I knew that was the way it should have been done but for some reason thought that the curved top would work better for what I wanted. This of course resulted in the cakes sitting on the dome with a small gap around each bottom where the cakes gently sloped away from the centre but luckily this was hidden behind white ribbon and some icing piped in to the gap.
Another mistake I made was ordering specialist cake carriers to transport the cakes – I was so worried about the four hour journey and how I would store the cakes but in the end, despite being really large, the carriers were too shallow for the iced cakes and my husband managed to get some cake boxes from our local bakery which were much better. Expensive lesson learned there!
I also learned was that three tiers for a small wedding is a lot of cake! I really could have just made two and there would still have been plenty to go around. I think my poor family are still eating cake even today.
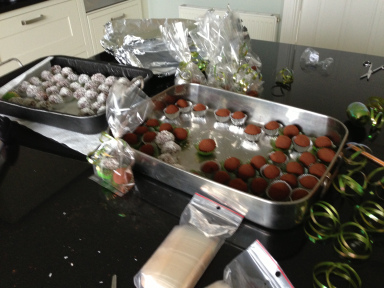
Finally I also made lovely chocolate truffles as wedding favours using Trish Deseine’s recipe from the Chocolat Atelier Book – these went down really well and didn’t take long at all. I made two varieties – milk chocolate and coconut and dark chocolate with cocoa powder coating.
The most important thing I realised after the cake was assembled and the day was in full swing is that the cake doesn’t need to be perfect, there is so much more important stuff going on!
Useful stockists for sugar paste, tins, ribbon and all the things you are likely to need are Squires Kitchen and Bakeworld and of course if you have an aunt that knows her stuff she will come in very handy too x


Hi, subscribed to your blog ages ago and this the first e-mail I have received. Thank you for sharing and what a beautiful cake. Simply but very delicate just like butterflies. Sorry to hear about your mum I lost my mum in September of 2010 and I still miss her.
Hello and welcome! Thanks so much for your kind words and I am sorry to hear that you lost your mum too. I think of mine every day. I really missed my blog but had to take time out. Glad to be back now.
You did the most fantastic job darling. That cake is exquisite
Ax
Thanks so much Aoife xx I was quite pleased with it (if I squinted and stood at the back of the room :) ). Hubs had to tell me to walk away from it at one point.
That’s beautiful!
Thank you Breige!! It worked out well x
Well done on an amazing job, it’s a lovely story behind the butterflies x
Oh and welcome back to the bloggy world :)
Thanks so much x I was so pleased the butterflies worked – took me about 100 attempts but I got there in the end! It’s good to be back x
That is amazing! You’ll have to move and change all your numbers, because the phone will be ringing off the hook for you to do more!
Thanks for such a lovely comment. I think this was a one off :) I’ll stick to the odd birthday cake perhaps!
You did such a great job! My sister asked me to make a 3 D christening cake for her son last year. I should have said no!! Nightmare to roll icing in 32C weather!
I love your cake simple but yet so pretty and I love the butterfly!
Thanks so much Peggy! Oh I don’t envy you that heat – that’s one thing at least that was on my side, our cool climate was ideal :)
Wow this is beautiful so elegant. All your hard work paid off. The butterflies are beautiful and love the symbolism of them particularly on such a special family day.
Thank you! It was definitely something worth doing, just for the experience of it alone.
wow this cake looks amazing. Thank you for uploading pictures of decorations which you made and information how you made it. I found it very helpful and I’m sure others will enjoy reading your article as well.
Thank you, that’s very kind.
Aw yeah, you’re back :) Delighted to see you back in the blog world saddle. The cake is just amazing, you’re so talented and I love how you remembered your mum with the butterflies
Aw thanks Lynn :) lovely comment and thanks for checking back in. Was very pleased with the cake in the end. Once I got over the near-breakdown :)